
Kubernetes 中用 SpringBoot Admin+SpringCloud Kubernetes 监控&调试 SpringBoot 应用
文章目录
!版权声明:本博客内容均为原创,每篇博文作为知识积累,写博不易,转载请注明出处。
系统环境:
- Kubernetes 版本:1.14.0
- SpringBoot 版本:2.1.6.RELEASE
- SpringBoot Admin 版本:2.1.5
- Admin 示例代码 Github 地址: https://github.com/my-dlq/blog-example/tree/master/springcloud/springboot-admin-demo
背景:
Spring Boot Admin 是一个开源社区项目,用于管理和监控 SpringBoot 应用程序,展示Spring Boot Admin Client 的 Actuator 端点上的一些监控信息。这里要在 Kubernetes 中部署 SpringBoot Admin,由于 Kubernetes 自带服务发现,所以去掉注册中心等,这里需要和 SpringCloud Kubernetes 完成 Kubernetes 下的服务发现。这里将演示 SpringBoot Admin 与 SpringCloud Kubernetes 配合完成监控 Kubernetes 中的 SpringBoot 应用。
一、SrpingBoot Admin 介绍
Spring Boot Admin 是一个开源社区项目,用于管理和监控 SpringBoot 应用程序,展示Spring Boot Admin Client 的 Actuator 端点上的一些监控信息。
它为应用程序提供以下功能:
- 显示应用健康状况
- 关注并下载日志文件
- 查看jvm系统和环境属性
- 查看Spring Boot配置属性
- 支持Spring Cloud的postable / env-和/ refresh-endpoint
- 轻松的日志级管理
- ......
二、SrpingCloud Kubernetes 介绍
Spring Cloud Kubernetes 提供 Kubernetes 环境下服务发现的 Spring Cloud 通用接口实现。主要目的是促进在 Kubernetes 中运行的 Spring Cloud 和 Spring Boot 应用程序的集成。
这里我们主要用 SpringCloud Kubernetes 来为 SpringBoot Admin 提供 Kubernetes 环境下的服务发现。
三、创建 SpringBoot Admin 应用
创建 SpringBoot Admin 应用,且引入 SpringCloud Kubernetes 作为服务发现。
Maven 引入相关依赖
在 Maven 中引入 “spring-boot-admin-starter-server” 与 “spring-cloud-kubernetes-discovery” 依赖。
 1<?xml version="1.0" encoding="UTF-8"?>
 2<project xmlns="http://maven.apache.org/POM/4.0.0" xmlns:xsi="http://www.w3.org/2001/XMLSchema-instance"
 3         xsi:schemaLocation="http://maven.apache.org/POM/4.0.0 http://maven.apache.org/xsd/maven-4.0.0.xsd">
 4    <modelVersion>4.0.0</modelVersion>
 5
 6    <parent>
 7        <groupId>org.springframework.boot</groupId>
 8        <artifactId>spring-boot-starter-parent</artifactId>
 9        <version>2.1.6.RELEASE</version>
10        <relativePath/>
11    </parent>
12
13    <groupId>club.mydlq</groupId>
14    <artifactId>springboot-admin-k8s</artifactId>
15    <version>0.0.2</version>
16    <name>springboot-admin-k8s</name>
17    <description>demo</description>
18
19    <properties>
20        <java.version>1.8</java.version>
21    </properties>
22
23    <dependencies>
24        <!--web-->
25        <dependency>
26            <groupId>org.springframework.boot</groupId>
27            <artifactId>spring-boot-starter-web</artifactId>
28        </dependency>
29        <!--SpringBoot Admin-->
30        <dependency>
31            <groupId>de.codecentric</groupId>
32            <artifactId>spring-boot-admin-starter-server</artifactId>
33            <version>2.1.5</version>
34        </dependency>
35        <!--SpringCloud Kubernetes-->
36        <dependency>
37            <groupId>org.springframework.cloud</groupId>
38            <artifactId>spring-cloud-kubernetes-discovery</artifactId>
39            <version>1.0.2.RELEASE</version>
40        </dependency>
41    </dependencies>
42
43    <build>
44        <plugins>
45            <plugin>
46                <groupId>org.springframework.boot</groupId>
47                <artifactId>spring-boot-maven-plugin</artifactId>
48            </plugin>
49        </plugins>
50    </build>
51</project>
配置 application 文件
加上两个参数:
- spring.cloud.kubernetes.discovery.primaryPortName:
- spring.cloud.kubernetes.discovery.serviceLabels:
 1server:
 2  port: 8080
 3
 4management:
 5  server:
 6    port: 8081                          #---指定监控数据端口为8081,避免和 server.port 一致产生风险
 7  endpoints:
 8    web:
 9      exposure:
10        include: "*"
11
12spring:
13  application:
14    name: springboot-admin-k8s
15  cloud:
16    kubernetes:
17      discovery:
18        primaryPortName: management     #---按设要监控 Service 的端口名称
19        serviceLabels:
20          admin: enabled                #---设置要监控 Service 的 Label 标签
启动类
需要加上四个注解:
- @SpringBootApplication:开启 SpringBoot 相关注解,会自动配置相关信息。
- @EnableDiscoveryClient:开启 Spring服务发现机制。
- @EnableAdminServer:开启 SpringBoot Admin。
- @EnableScheduling:开启定时任务,不加此注解服务发现不会执行定时刷新。
 1import de.codecentric.boot.admin.server.config.EnableAdminServer;
 2import org.springframework.boot.SpringApplication;
 3import org.springframework.boot.autoconfigure.SpringBootApplication;
 4import org.springframework.cloud.client.discovery.EnableDiscoveryClient;
 5import org.springframework.scheduling.annotation.EnableScheduling;
 6
 7@SpringBootApplication
 8@EnableDiscoveryClient
 9@EnableAdminServer
10@EnableScheduling
11public class Application {
12
13    public static void main(String[] args) {
14        SpringApplication.run(Application.class, args);
15    }
16
17}
四、将 SpringBoot 应用构建 Docker 镜像
将上面创建的 SpringBoot Admin 应用编译成 Docker 镜像。
执行 Maven 打包
1$ mvn clean package
Dockerfile 文件
1FROM openjdk:8u212-b04-jre-slim
2VOLUME /tmp
3ADD target/*.jar app.jar
4RUN sh -c 'touch /app.jar'
5ENV JVM_OPTS="-Xss256k -XX:MaxRAMPercentage=80.0 -Duser.timezone=Asia/Shanghai -Djava.security.egd=file:/dev/./urandom"
6ENV JAVA_OPTS=""
7ENV APP_OPTS=""
8ENTRYPOINT [ "sh", "-c", "java $JVM_OPTS $JAVA_OPTS -jar /app.jar $APP_OPTS" ]
编译 Docker 镜像,且推送到仓库
1$ docker build -t mydlqclub/springboot-admin-k8s:0.0.1 .
推送到 Docker 仓库
一般推送选择推到到自己私人仓库,为了方便这里使用的是 docker 官方仓库,将其推送到仓库,方便后续 Kubernetes 操作。
1$ docker push mydlqclub/springboot-admin-k8s:0.0.1
五、部署应用到 Kubernetes
将 SpringBoot Admin 应用部署到 Kubernetes 中,这里提前设置 Kubernetes 部署的 yaml 文件,然后执行 Kubectl 命令将其启动。
准备应用 yaml 文件
springboot-admin-rbac.yaml
由于 SpringBoot Admin 需要服务发现,所以创意一个 ServiceAccount。注意提前修改角色所属的“namespace”
 1apiVersion: v1
 2kind: ServiceAccount
 3metadata:
 4  name: springboot-admin-k8s
 5  namespace: mydlqcloud
 6---
 7kind: ClusterRoleBinding
 8apiVersion: rbac.authorization.k8s.io/v1beta1
 9metadata:
10  name: springboot-admin-k8s
11subjects:
12  - kind: ServiceAccount
13    name: springboot-admin-k8s
14    namespace: mydlqcloud
15roleRef:
16  kind: ClusterRole
17  name: cluster-admin
18  apiGroup: rbac.authorization.k8s.io
springboot-admin-k8s.yaml
注意下面的 Service 注释说明,必须设置对应 Label 和 Port 名称,SpringBoot Admin 会发现带有这些名称的 Service 和 Port。
 1apiVersion: v1
 2kind: Service
 3metadata:
 4  name: springboot-admin-k8s
 5  labels:
 6    app: springboot-admin-k8s
 7    admin: enabled            #---设置此标签,表示此应用被 Springboot Admin 服务发现
 8  annotations:
 9spec:
10  type: NodePort              #---通过NodePort方式暴露端口,方便外界访问
11  ports:
12    - name: server            #---服务端口名,用于访问监控 UI
13      nodePort: 30080
14      port: 8080
15      targetPort: 8080
16    - name: management        #---指定监控端口名,表示此应用被 Springboot Admin 服务发现
17      nodePort: 30081
18      port: 8081
19      targetPort: 8081
20  selector:
21    app: springboot-admin-k8s
22---
23apiVersion: apps/v1
24kind: Deployment
25metadata:
26  name: springboot-admin-k8s
27  labels:
28    app: springboot-admin-k8s
29spec:
30  replicas: 1
31  selector:
32    matchLabels:
33      app: springboot-admin-k8s
34  template:
35    metadata:
36      labels:
37        app: springboot-admin-k8s
38    spec:
39      serviceAccountName: springboot-admin-k8s
40      containers:
41      - name: springboot-admin-k8s
42        image: mydlqclub/springboot-admin-k8s:0.0.1
43        imagePullPolicy: Always
44        ports:
45        - containerPort: 8080
46          name: server
47        - containerPort: 8081
48          name: management
49        resources:
50          limits:
51            cpu: 1000m
52            memory: 512Mi
53          requests:
54            cpu: 500m
55            memory: 256Mi
在 Kubernetes 创建应用
利用 Kubectl 命令执行 yaml 文件,创建角色和应用部署对象。
- -n:指定应用创建的 Namespace,应该替换成自己 Kubernetes 集群中的 Namespace 名称
部署 SpringBoot Admin RBAC
1$ kubectl apply -f springboot-admin-rbac.yaml -n mydlqcloud
部署 SpringBoot Admin Deployment
1$ kubectl apply -f springboot-admin-k8s.yaml -n mydlqcloud
查看已经启动的 SpringBoot Admin 应用
利用 Kubectl 命令查看 Kubernetes 中启动的应用,可以看到 SpringBoot Admin 已经成功启动。
1$ kubectl get pods -n mydlqcloud
2
3NAME                                          READY   STATUS    RESTARTS   AGE
4springboot-admin-k8s-54c668b5ff-b9snz         1/1     Running   0          1m
六、进入 SpringBoot Admin 界面查看应用信息
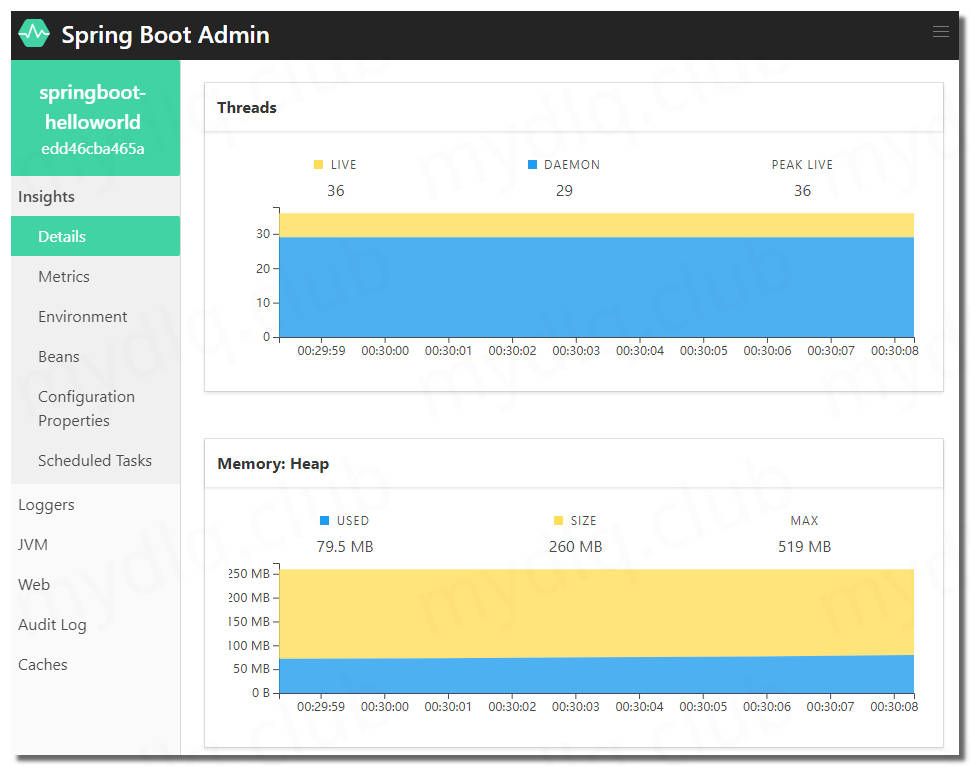
输入 Kubernetes 集群地址和 SpringBoot Admin Service 的 NodePort 端口,http://ClusterIP:30080 访问 Admin 服务,本人地址为:http://192.168.2.11:30080,打开后看到 Admin 的 UI 界面如下:

七、新增示例进行测试
上面的监控的只有一条应用信息,即 SpringBoot Admin 本身,为了测试其它 SpringBoot 应用是否能正确显示在监控看板,这里我们部署一个示例 “Hello-World” 项目。
创建一个 SpringBoot 项目且 Maven 引入相关依赖
 1<?xml version="1.0" encoding="UTF-8"?>
 2<project xmlns="http://maven.apache.org/POM/4.0.0" xmlns:xsi="http://www.w3.org/2001/XMLSchema-instance"
 3         xsi:schemaLocation="http://maven.apache.org/POM/4.0.0 http://maven.apache.org/xsd/maven-4.0.0.xsd">
 4    <modelVersion>4.0.0</modelVersion>
 5
 6    <parent>
 7        <groupId>org.springframework.boot</groupId>
 8        <artifactId>spring-boot-starter-parent</artifactId>
 9        <version>2.1.4.RELEASE</version>
10        <relativePath/>
11    </parent>
12
13    <groupId>club.mydlq</groupId>
14    <artifactId>springboot-helloworld</artifactId>
15    <version>0.0.1</version>
16    <name>springboot-helloworld</name>
17    <description>This a project for Spring Boot , use docker build for helm</description>
18
19    <properties>
20        <java.version>1.8</java.version>
21    </properties>
22
23    <dependencies>
24    	<!-- SpringBoot Web -->
25        <dependency>
26            <groupId>org.springframework.boot</groupId>
27            <artifactId>spring-boot-starter-web</artifactId>
28        </dependency>
29        <!-- 设置 Actuator 暴露监控数据 -->
30        <dependency>
31            <groupId>org.springframework.boot</groupId>
32            <artifactId>spring-boot-starter-actuator</artifactId>
33        </dependency>
34    </dependencies>
35
36    <build>
37        <plugins>
38            <plugin>
39                <groupId>org.springframework.boot</groupId>
40                <artifactId>spring-boot-maven-plugin</artifactId>
41            </plugin>
42        </plugins>
43    </build>
44</project>
配置 application 文件
application.yaml 配置中配置 management 暴露一些监控端口,且设置端口为 8081
 1spring:
 2  application:
 3    name: springboot-helloworld
 4
 5server:
 6  port: 8080
 7
 8management:
 9  server:
10    port: 8081   #---指定监控数据端口为8081
11  endpoints:
12    web:
13      exposure:
14        include: "*"
执行 Maven打包、Docker编译与推送
执行 Maven 打包,然后执行 Docker 镜像构建,构建完成后推送到 Docker 仓库,和上面 SpringBoot Admin 时保持一致
1$ mvn clean package
2$ docker build -t mydlqclub/springboot-helloworld:0.0.1 .
3$ docker push mydlqclub/springboot-helloworld:0.0.1
配置 Kubernetes 中部署应用的 yaml 文件
注意: 且在 Kubernetes 部署的 yaml 文件中 Service 必须设置一个"admin: enabled"标签,然后配置的8081端口名称必须和 SpringBoot Admin 配置中"primaryPortName"参数设置监控端口的名称保持一致,设置为“management”,否则将无法监控到,因为SpringBoot Admin配置的监控条件是监控 Service 中带 "admin: enabled" 标签,且存在端口名称为 "management" 的服务。
springboot-helloworld.yaml
 1apiVersion: v1
 2kind: Service
 3metadata:
 4  name: springboot-helloworld
 5  labels:
 6    app: springboot-helloworld
 7    admin: enabled            #---设置此标签,表示此应用被 Springboot Admin 服务发现
 8  annotations:
 9spec:
10  type: ClusterIP
11  ports:
12    - name: server
13      port: 8080
14      targetPort: 8080
15    - name: management        #---指定监控端口名,表示此应用被 Springboot Admin 服务发现
16      port: 8081
17      targetPort: 8081
18  selector:
19    app: springboot-helloworld
20---
21apiVersion: apps/v1
22kind: Deployment
23metadata:
24  name: springboot-helloworld
25  labels:
26    app: springboot-helloworld
27spec:
28  replicas: 2                 #---设置副本数为2
29  selector:
30    matchLabels:
31      app: springboot-helloworld
32  template:
33    metadata:
34      labels:
35        app: springboot-helloworld
36    spec:
37      containers:
38      - name: springboot-helloworld
39        image: mydlqclub/springboot-helloworld:0.0.1
40        imagePullPolicy: Always
41        ports:
42        - containerPort: 8080
43          name: server
44        - containerPort: 8081
45          name: management
46        resources:
47          limits:
48            cpu: 1000m
49            memory: 512Mi
50          requests:
51            cpu: 500m
52            memory: 256Mi
执行 Kubectl 命令创建应用
1$ kubectl apply -f springboot-helloworld.yaml -n mydlqcloud
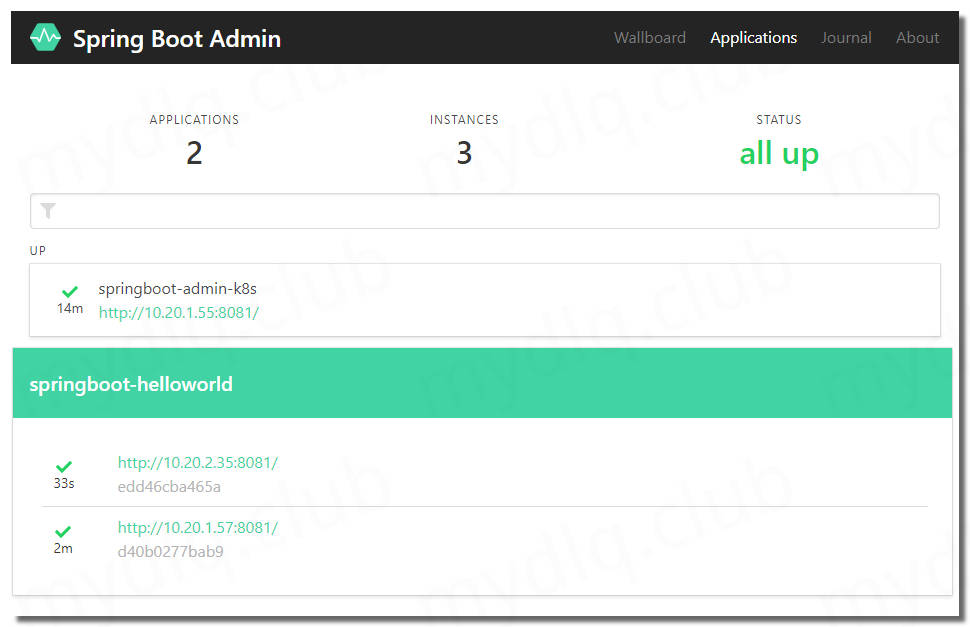
SpringBoot Admin 中查看信息
在此访问 SpringBoot Admin 页面,可以看到已经监控到新增应用信息,且正确的监控到此应用有两个副本。
八、添加安全模块
经过上面测试,已经 SpringBoot Admin 能够成功监控 Kubernetes 某个 Namespace 下的服务了,不过还有一个问题,就是这个地址一打开就能进去,这样并不安全,好在 SpringBoot Admin 可以和 Spring Security 配合,组成一套简单的安全验证的登录逻辑,如下:
Maven 引入 Spring Security 依赖
1<dependency>
2    <groupId>org.springframework.boot</groupId>
3    <artifactId>spring-boot-starter-security</artifactId>
4</dependency>
添加配置 Security 配置类
 1import de.codecentric.boot.admin.server.config.AdminServerProperties;
 2import org.springframework.context.annotation.Configuration;
 3import org.springframework.security.config.annotation.web.builders.HttpSecurity;
 4import org.springframework.security.config.annotation.web.configuration.WebSecurityConfigurerAdapter;
 5import org.springframework.security.web.authentication.SavedRequestAwareAuthenticationSuccessHandler;
 6import org.springframework.security.web.csrf.CookieCsrfTokenRepository;
 7
 8@Configuration
 9public class LoginSecurity extends WebSecurityConfigurerAdapter {
10
11    private String adminContextPath;
12
13    public LoginSecurity(AdminServerProperties adminServerProperties) {
14        this.adminContextPath = adminServerProperties.getContextPath();
15    }
16
17    @Override
18    protected void configure(HttpSecurity http) throws Exception {
19        SavedRequestAwareAuthenticationSuccessHandler successHandler = new SavedRequestAwareAuthenticationSuccessHandler();
20        successHandler.setTargetUrlParameter("redirectTo");
21        successHandler.setDefaultTargetUrl(adminContextPath + "/");
22
23        http.authorizeRequests()
24                .antMatchers(adminContextPath + "/assets/**").permitAll()
25                .antMatchers(adminContextPath + "/login").permitAll()
26                .antMatchers(adminContextPath + "/actuator/health").permitAll()
27                .anyRequest().authenticated()
28                .and()
29                .formLogin().loginPage(adminContextPath + "/login").successHandler(successHandler).and()
30                .logout().logoutUrl(adminContextPath + "/logout").and()
31                .httpBasic().and()
32                .csrf()
33                .csrfTokenRepository(CookieCsrfTokenRepository.withHttpOnlyFalse())
34                .ignoringAntMatchers(
35                        adminContextPath + "/instances",
36                        adminContextPath + "/actuator/**"
37                );
38    }
39
40}
配置文件中添加静态用户名、密码
由于是简单安全验证,所以将用户名、密码配置在配置文件中。
1spring:
2  security:
3    user:
4      name: "admin"
5      password: "123456"
重新部署进行测试
还是用上面的部署 yaml 文件重新部署 SpringBoot Admin 到 Kubernetes 环境,命令如下:
1$ kubectl apply -f springboot-admin-k8s.yaml -n mydlqcloud
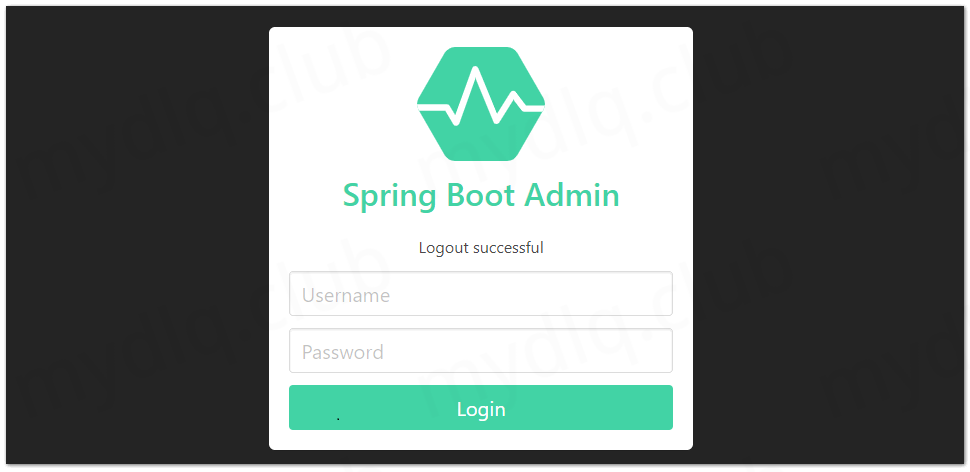
部署完成后重新访问 http://192.168.2.11:30080 地址,然后可以看到如下登录界面:
---END---

!版权声明:本博客内容均为原创,每篇博文作为知识积累,写博不易,转载请注明出处。