
SpringBoot 利用 Swagger2 调试 API
文章目录
!版权声明:本博客内容均为原创,每篇博文作为知识积累,写博不易,转载请注明出处。
系统环境:
- SpringBoot版本: 2.1.5
- Swagger版本: 2.9.2
- 示例Github地址:https://github.com/my-dlq/blog-example/tree/master/springboot/springboot-swagger-example
一、背景:
由于Spring Boot能够快速开发、便捷部署等特性,相信有很大一部分Spring Boot的用户会用来构建RESTful API。而我们构建RESTful API的目的通常都是由于多终端的原因,这些终端会共用很多底层业务逻辑,因此我们会抽象出这样一层来同时服务于多个移动端或者Web前端。
这样一来,我们的RESTful API就有可能要面对多个开发人员或多个开发团队:IOS开发、Android开发或是Web开发等。为了减少与其他团队平时开发期间的频繁沟通成本,传统做法我们会创建一份RESTful API文档来记录所有接口细节,然而这样的做法有以下几个问题:
- 由于接口众多,并且细节复杂(需要考虑不同的HTTP请求类型、HTTP头部信息、HTTP请求内容等),高质量地创建这份文档本身就是件非常吃力的事,下游的抱怨声不绝于耳。
- 随着时间推移,不断修改接口实现的时候都必须同步修改接口文档,而文档与代码又处于两个不同的媒介,除非有严格的管理机制,不然很容易导致不一致现象。
为了解决上面这样的问题,本文将介绍RESTful API的重磅好伙伴Swagger2,它可以轻松的整合到SpringBoot中,并与Spring MVC程序配合组织出强大RESTful API文档。它既可以减少我们创建文档的工作量,同时说明内容又整合入实现代码中,让维护文档和修改代码整合为一体,可以让我们在修改代码逻辑的同时方便的修改文档说明。另外Swagger2也提供了强大的页面测试功能来调试每个RESTful API。
二、Swagger简介:
Swagger 既是一款接口的文档在线自动生成软件,也是一个规范和完整的框架,用于生成、描述、调用和可视化 RESTful 风格的 Web 服务。总体目标是使客户端和文件系统作为服务器以同样的速度来更新。文件的方法,参数和模型紧密集成到服务器端的代码,允许API来始终保持同步。Swagger 让部署管理和使用功能强大的API从未如此简单。
三、Springboot 项目集成 Swagger2
1、Maven 引入 Swagger2 依赖
新建 Maven 项目,往其 pom.xml 中引入 Springboot 及 Swagger 相关 Jar。
 1<?xml version="1.0" encoding="UTF-8"?>
 2<project xmlns="http://maven.apache.org/POM/4.0.0" xmlns:xsi="http://www.w3.org/2001/XMLSchema-instance"
 3         xsi:schemaLocation="http://maven.apache.org/POM/4.0.0 http://maven.apache.org/xsd/maven-4.0.0.xsd">
 4    <modelVersion>4.0.0</modelVersion>
 5
 6    <groupId>club.mydlq</groupId>
 7    <artifactId>swagger-example-service</artifactId>
 8    <version>1.0.0</version>
 9    <name>swagger-example-service</name>
10    <description>springboot swagger api example service</description>
11
12    <properties>
13        <java.version>1.8</java.version>
14    </properties>
15
16    <dependencies>
17    	<!-- SpringBoot Web -->
18        <dependency>
19            <groupId>org.springframework.boot</groupId>
20            <artifactId>spring-boot-starter-web</artifactId>
21            <version>2.1.5.RELEASE</version>
22        </dependency>
23        <!-- 引入Lombok,方便开发 -->
24        <dependency>
25            <groupId>org.projectlombok</groupId>
26            <artifactId>lombok</artifactId>
27            <version>1.18.8</version>
28            <scope>provided</scope>
29        </dependency>
30        <!-- 引入Swagger相关依赖 -->
31        <dependency>
32            <groupId>io.springfox</groupId>
33            <artifactId>springfox-swagger2</artifactId>
34            <version>2.9.2</version>
35        </dependency>
36        <dependency>
37            <groupId>io.springfox</groupId>
38            <artifactId>springfox-swagger-ui</artifactId>
39            <version>2.9.2</version>
40        </dependency>
41    </dependencies>
42
43    <build>
44        <plugins>
45            <plugin>
46                <groupId>org.springframework.boot</groupId>
47                <artifactId>spring-boot-maven-plugin</artifactId>
48            </plugin>
49        </plugins>
50    </build>
51
52</project>
2、创建 Swagger 配置类
创建 Swagger 配置类,设置 Swagger 文档信息。
注意:配置中不要设置 “groupName” 参数,否则可能无法文档聚合。
 1import org.springframework.beans.factory.annotation.Value;
 2import org.springframework.context.annotation.Bean;
 3import org.springframework.context.annotation.Configuration;
 4import springfox.documentation.builders.ApiInfoBuilder;
 5import springfox.documentation.builders.PathSelectors;
 6import springfox.documentation.builders.RequestHandlerSelectors;
 7import springfox.documentation.service.ApiInfo;
 8import springfox.documentation.spi.DocumentationType;
 9import springfox.documentation.spring.web.plugins.Docket;
10
11@Configuration
12public class SwaggerConfig {
13
14    @Value("${swagger.enable}")
15    private boolean swaggerEnable;  // 读取配置文件中 swagger 开关参数的值
16
17    @Bean
18    public Docket createRestApi() {
19        return new Docket(DocumentationType.SWAGGER_2)
20                .enable(swaggerEnable)                  // 是否启用 Swagger
21                .apiInfo(apiInfo())
22                //.groupName("swagger-example-service") // 项目组名
23                .select()                               // 选择那些路径和api会生成document
24                .apis(RequestHandlerSelectors.any())    // 对所有api进行监控
25                .paths(PathSelectors.any())             // 对所有路径进行监控
26                .paths(Predicates.not(PathSelectors.regex("/error.*")))//错误路径不监控
27                .paths(Predicates.not(PathSelectors.regex("/actuator.*")))//actuator路径跳过
28                .build();
29    }
30
31    private ApiInfo apiInfo() {
32        return new ApiInfoBuilder()
33                .title("swagger-example-service")           // 文档标题
34                .description("This is a swagger project.")  // 文档描述
35                .version("1.0.0")                           // 文档版本
36                .build();
37    }
38
39}
3、配置文件中添加 swagger 开关参数
配置文件 application.yml 中添加 swagger.enable 配置参数,方便控制是否开启 swagger,一般在生产环境中我们会设置这个值为 false。
1spring:
2  application:
3    name: swagger-example-service
4
5### Swagger开关配置参数
6swagger:
7  enable: true
4、创建 user 实体类
为了方便测试,这里创建一个 User 实体类,并且利用 Swagger 的 @ApiModelProperty 注解对实体类某个属性描述,方便Swagger文档中描述实体类中信息。
 1import io.swagger.annotations.ApiModelProperty;
 2import java.util.Date;
 3
 4public class User {
 5	// @ApiModelProperty:用于描述字段信息
 6    @ApiModelProperty(value = "姓名", required = true)
 7    private String name;
 8    @ApiModelProperty(value = "性别", required = true)
 9    private String sex;
10    @ApiModelProperty(value = "岁数", required = true)
11    private Integer age;
12    @ApiModelProperty(value = "生日")
13    private Date birthday;
14}
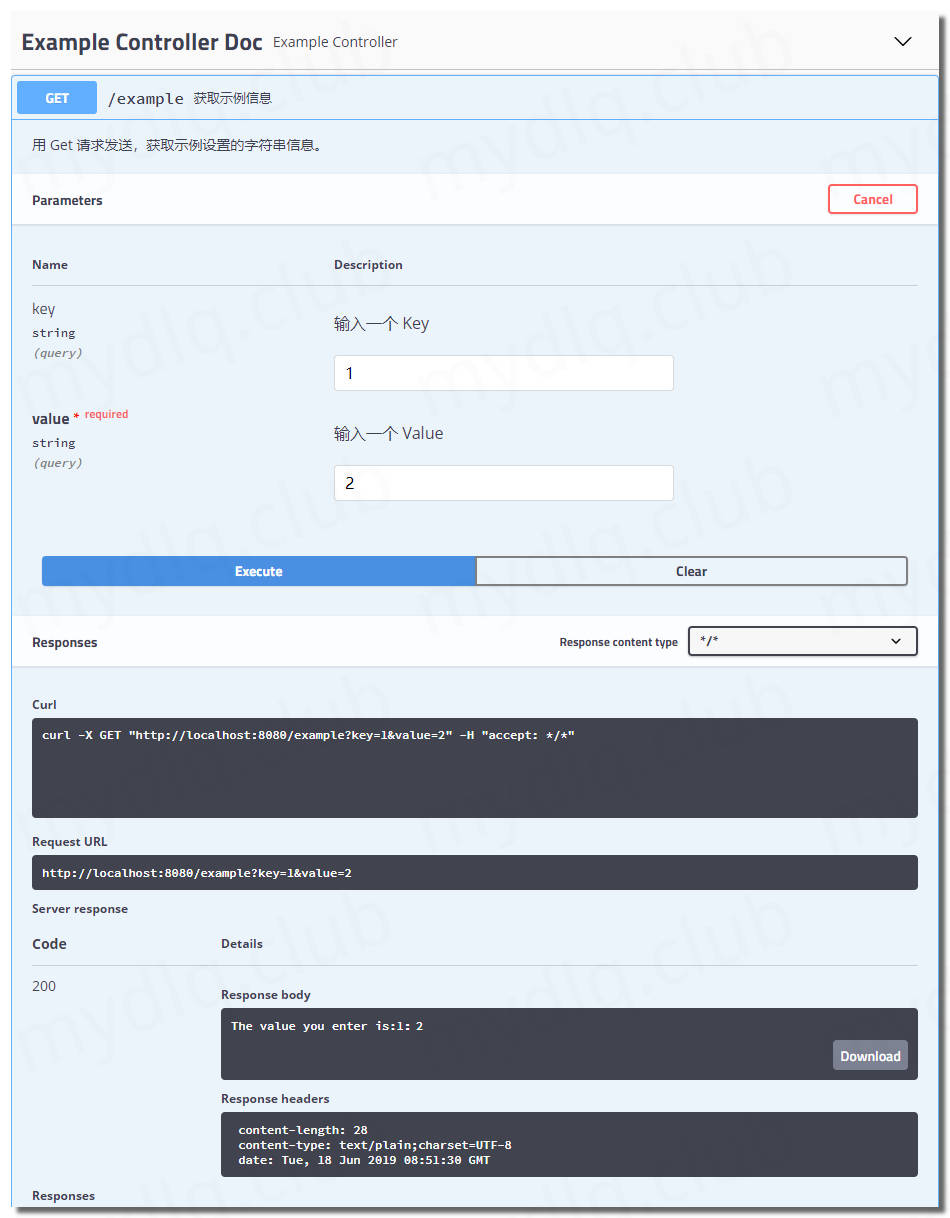
5、创建示例 Controller 接口
创建一个 Controller 类,且运用 Swagger 注解,将接口信息详细描述。
这里用了几个 Swagger 注解,分别为:
- @Api:对整个 Controller 接口信息的描述
- @ApiOperation:对某个接口信息进行描述
- @ApiResponses:对某个反馈信息状态码进行描述
- @ApiParam:对某个接口参数进行描述
 1import io.swagger.annotations.*;
 2import org.springframework.http.HttpHeaders;
 3import org.springframework.http.HttpStatus;
 4import org.springframework.http.ResponseEntity;
 5import org.springframework.util.MimeTypeUtils;
 6import org.springframework.web.bind.annotation.*;
 7
 8@RestController
 9@Api(tags = "Example Controller Document")
10public class ExampleController {
11
12    @GetMapping(value = "/example")
13    @ApiOperation(value = "获取示例信息", notes = "用 Get 请求发送,获取示例设置的字符串信息。")
14    @ApiResponses({
15            @ApiResponse(code = 200, message = "成功处理请求"),
16            @ApiResponse(code = 401, message = "没有权限访问该服务"),
17            @ApiResponse(code = 403, message = "权限不足无法访问该服务"),
18            @ApiResponse(code = 404, message = "未发现该微服务"),
19            @ApiResponse(code = 500, message = "服务器内部错误")
20    })
21    public String getExample(
22            @ApiParam(value = "输入一个 Key") @RequestParam(value = "key") String key,
23            @ApiParam(value = "输入一个 Value", required = true) @RequestParam(value = "value") String value) {
24        return "The value you enter is:" + key + ":" + value;
25    }
26
27    @PostMapping(value = "/example")
28    @ApiOperation(value = "发送示例信息", notes = "Post方法,发送示例信息")
29    @ApiResponses({
30            @ApiResponse(code = 200, message = "成功处理请求"),
31            @ApiResponse(code = 401, message = "没有权限访问该服务"),
32            @ApiResponse(code = 403, message = "权限不足无法访问该服务"),
33            @ApiResponse(code = 404, message = "未发现该微服务"),
34            @ApiResponse(code = 500, message = "服务器内部错误")
35    })
36    public ResponseEntity<User> postExample(@ApiParam(value = "用户信息") @RequestBody User user) {
37        // 设置状态码,且设置默认值为200
38        HttpStatus httpStatus = HttpStatus.OK;
39        return new ResponseEntity<User>(user,httpStatus);
40    }
41
42    @PutMapping(value = "/example")
43    @ApiResponses({
44            @ApiResponse(code = 200, message = "成功处理请求"),
45            @ApiResponse(code = 201, message = "被创建"),
46            @ApiResponse(code = 401, message = "没有权限访问该服务"),
47            @ApiResponse(code = 403, message = "权限不足无法访问该服务"),
48            @ApiResponse(code = 404, message = "未发现该微服务"),
49            @ApiResponse(code = 500, message = "服务器内部错误")
50    })
51    @ApiOperation(value = "修改示例信息", notes = "Put方法,修改示例信息")
52    public ResponseEntity<User> putExample(@ApiParam(value = "用户信息") @RequestBody User user) {
53        // 设置状态码,且设置默认值为200
54        HttpStatus httpStatus = HttpStatus.OK;
55        // 设置 Headers
56        HttpHeaders httpHeaders = new HttpHeaders();
57        httpHeaders.add(HttpHeaders.CONTENT_TYPE, MimeTypeUtils.APPLICATION_JSON_VALUE);
58        // 错误就发送 500 错误
59        if (user == null) {
60            httpStatus = HttpStatus.INTERNAL_SERVER_ERROR;
61        }
62        return new ResponseEntity<User>(user, httpHeaders, httpStatus);
63    }
64
65    @DeleteMapping(value = "/example/{key}")
66    @ApiOperation(value = "删除示例信息", notes = "Delete方法,删除示例信息。")
67    @ApiResponses({
68            @ApiResponse(code = 200, message = "成功处理请求"),
69            @ApiResponse(code = 204, message = "成功处理请求,服务器无返回内容"),
70            @ApiResponse(code = 401, message = "没有权限访问该服务"),
71            @ApiResponse(code = 403, message = "权限不足无法访问该服务"),
72            @ApiResponse(code = 404, message = "未发现该微服务"),
73            @ApiResponse(code = 500, message = "服务器内部错误")
74    })
75    public void deleteExample(@ApiParam(value = "输入一个 Key") @PathVariable(value = "key") String key) {
76        System.out.println("delete info " + key);
77    }
78
79}
6、启动类加上注解 @EnableSwagger2
在启动类上加上 @EnableSwagger2 注解以开启 Swagger2。
 1import org.springframework.boot.SpringApplication;
 2import org.springframework.boot.autoconfigure.SpringBootApplication;
 3import springfox.documentation.swagger2.annotations.EnableSwagger2;
 4
 5@EnableSwagger2
 6@SpringBootApplication
 7public class Application {
 8
 9    public static void main(String[] args) {
10        SpringApplication.run(Application.class, args);
11    }
12
13}
7、访问 Swagger API
项目创建完成后,本地启动然后输入地址 http://localhost:8080/v2/api-docs,可以看见 Swagger API 接口返回的 JSON 信息。
 1{
 2    "swagger": "2.0",
 3    "info": {
 4        "description": "This is a swagger project.",
 5        "version": "1.0.0",
 6        "title": "swagger-example-service"
 7    },
 8    "host": "localhost:8080",
 9    "basePath": "/",
10    "tags": [
11        {
12            "name": "Example Controller Doc",
13            "description": "Example Controller"
14        },
15        {
16            "name": "basic-error-controller",
17            "description": "Basic Error Controller"
18        }
19    ],
20    "paths": {
21        "/error": {
22            "get": {
23                "tags": [
24                    "basic-error-controller"
25                ],
26                "summary": "error",
27                "operationId": "errorUsingGET",
28                "produces": [
29                    "*/*"
30                ],
31                "responses": {
32                    "200": {
33                        "description": "OK",
34                        "schema": {
35                            "type": "object",
36                            "additionalProperties": {
37                                "type": "object"
38                            }
39                        }
40                    },
41                    "401": {
42                        "description": "Unauthorized"
43                    },
44                    "403": {
45                        "description": "Forbidden"
46                    },
47                    "404": {
48                        "description": "Not Found"
49                    }
50                }
51......
8、访问 Swagger UI
Swagger 除了有 Json 形式的数据外,也有对 Json 数据页面化展示的 Swagger UI,在开始的时候 pom.xml 就已经引入该 Swagger UI 相关 Jar,所以这里我们将项目启动后,输入地址 http://localhost:8080/swagger-ui.html 就能访问到 Swagger 接口信息。


!版权声明:本博客内容均为原创,每篇博文作为知识积累,写博不易,转载请注明出处。